Sub-Mesh Bounding Box
This is an experimental feature. To enable, check Enable Experimental Features in Preferences. Experimental features are only available as part of a Professional licence.
Intro
Create rectangles using the bounding boxes of sub-meshes (Duplicator, Text, SVG etc). See Sub-Mesh for more info on sub-meshes.
UI
Input Shape - Connect any other Shape containing sub-meshes.
Level - Set the level within the sub-mesh's hierarchy to affect.
Expand - Increase/ decrease the size of the bounding boxes generated.
Fixed Size - By default, the size of each bounding box is set by the size of each child-mesh (e.g. each character in a text string). By unchecking the Auto (Width/Height) checkboxes, the bounding boxes can be set to a fixed width and height.
Specific Indices - Enter specific ids for each sub-mesh to create a bounding box around. Enter comma separated values (e.g. 0, 4, 7) or create ranges using colons (e.g. 1:4) or a combination of both (e.g. 2, 3:5).
Sequences Keep Gaps - When checked, where the Specific Indices attribute contains ranges (e.g. 0:3), they will be converted to a sequence (e.g. 0,1,2,3). This can be used as a way to unify the heights of individual bounding boxes across letters with ascenders/descenders (e.g. h and y). Note that this feature only works across one row – mutli-line text/sub-meshes are not supported.
Remember that Ids start at 0 so the first word in a string would be id0.
- Create a Sub-Mesh Bounding Box Shape.
- Set its Fill Color to green.
- Create a Text Shape.
- Enter
Sub-Mesh Bounding Boxinto the Text attribute. - Connect textShape.id→subMeshBoundingBox.inputShape.
- Set the Level to 2 (Words are the 2nd level of the sub-mesh within a Text Shape).
- Enter
0,2into the Specific Indices attribute.
Green boxes will be drawn around the words Sub-Mesh and Box.
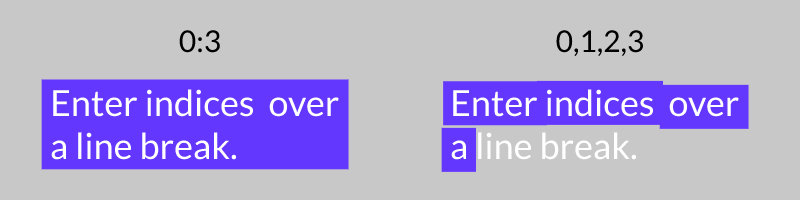
When entering ranges into Specific Indices be aware that where that range includes characters or words across line breaks, the resulting bounding box will encompass all characters or words. In the image below, despite the both examples incorporating the same indices, note how the range 0:3 creates a bounding box that encompasses Enter indices across a, whereas 0,1,2,3 creates a bounding box for each individual word.