Control Rows - Interaction
Intro
Every Layer consists of several attributes with values that can be keyframed or connected to or from other values. An attribute consists of two elements in the UI. A Control Row and a Control. The Control Row is the entire attribute row and can contain several Controls ([x, y], [r, g, b] etc.).
When the cursor is placed over a Control Row, several UI elements will appear/highlight.
Setting Control values
To set a Control:
- Hover over the Control.
- Click.
- Enter a value.

Controls can also be 'scrubbed' to set them.
- Hover over the Control.
- Click and hold.
- Move the cursor left or right.
Note that scrubbing values may be constrained when the cursor reaches the edge of a display. To prevent this, enable 'Infinite Scrubbing' in the Preferences window.
For Control Rows with multiple fields (e.g. Position X and Y), hold Option/Alt when scrubbing or committing values to affect all fields at the same time.
To set values for multiple Layers with matching Attributes at the same time:
- Load a Layer into the Attribute Editor.
- Select all the other Layers to update in the Scene Tree.
- Update the Attribute(s) in the Attribute Editor.
Use the ⇥ (Tab key) to move the focus to the next Control or Shift + ⇥ to move the focus to the previous Control. Note that macOS users may need to set a preference for this to work. To do this:
- Open 'System Settings...'.
- Navigate to 'Keyboard'.
- Enable 'Keyboard navigation'.
This setting can be toggled on/off using the shortcut control + F7 or fn + control + F7 depending on the Function Keys preference.
Constrain Proportions
Some int2 Controls also include a feature to constrain the proportions of the two values.

When the Constrain Proportions button is enabled (green), the original width to height ratio of the two values is maintained when either dimension is changed. For example, if a Rectangle has a Width of 100 and a Height of 200, increasing the Width to 200 will increase the Height proportionally to 400 (maintaining the 1:2 ratio).
Inline Expressions
It's possible to write simple mathematical expressions within a Control. For example, entering will result in a value of 36.
Setting Keyframes
To set a keyframe:
- Hover over the Control.
- A small diamond outline icon will appear in the Control.
- Move the cursor above this icon and click.
- The icon will switch to a green fill. This indicates a keyframe has been set.
For Control Rows with multiple Controls hold Option/Alt when clicking to create keyframes on all Controls.
The keyframe icon has 3 states:

- No keyframe - Indicates there is no animation on the Control.
- Keyframe Set - Indicates there is animation set on the Control.
- Keyframe Set (at frame) - Indicates there is animation set on the Control at the current frame in the Timeline.
Cavalry has Auto Key set to on by default. This means that once a keyframe is set, any changes to the value in the Control will either set new keyframes or, in the instance where the playhead is on the same frame as an existing keyframe, update one.
Keyframes can also be set by using the Control Row's contextual menu.
- Hover over the Control Row.
- Right click to invoke the contextual menu.
- Select 'Set Keyframe' to create keyframes on all channels. To create a key on a single channel choose the relevant channel to the right hand side of the window.
This window can also be used to Delete Keyframes in exactly the same way.
To remove all keyframes on a attribute/ channel use the Delete Animation option.
If the timeline is on the same frame as a key frame use Cmd/Ctrl + click to delete that keyframe.
Contextual menu
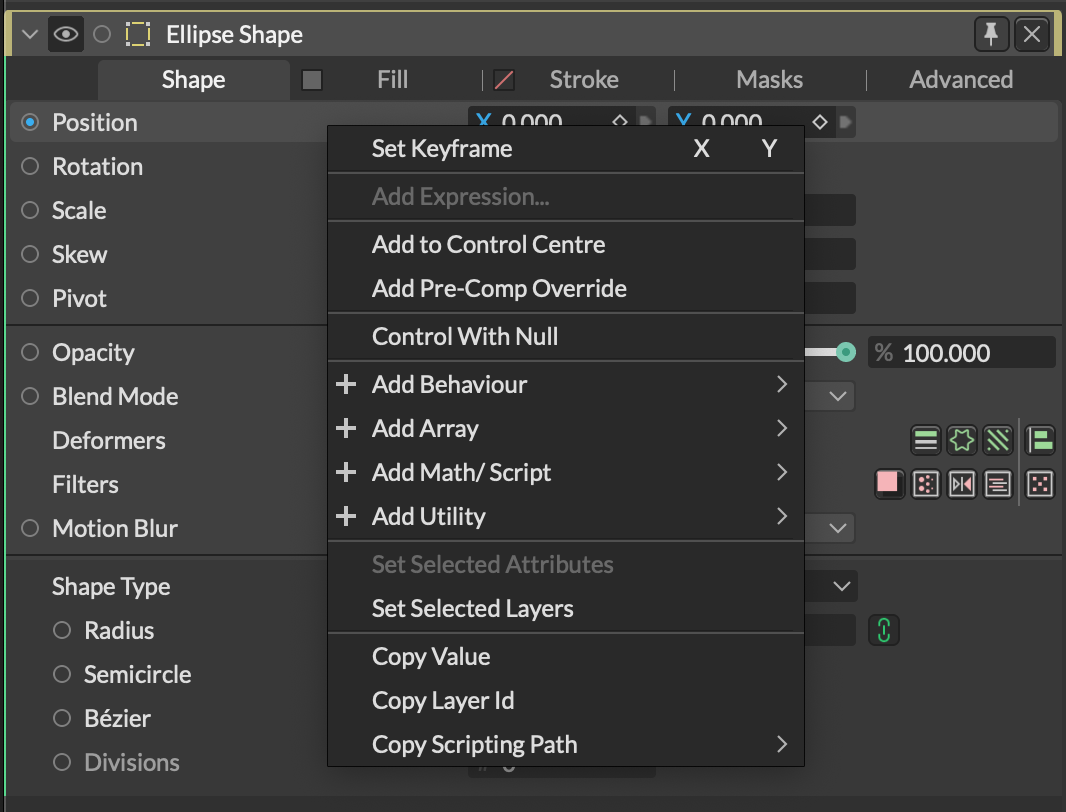
Right clicking on a Control Row will bring up a menu with various options depending on the type of row and whether it contains connections or not:
- Set Keyframe - Set a keyframe for the Attribute at the current frame. Where an Attribute row contains more than one Control (e.g. int2 or double2), select the relevant Control or click on the row to create keyframes for all Controls.
- Delete Keyframe - Delete the keyframe(s) at the current frame. Where an Attribute row contains more than one Control (e.g. int2 or double2), select the relevant Control or click on the row to delete the keyframes for all Controls.
- Delete Animation - Delete all keyframes. Where an Attribute row contains more than one Control (e.g. int2 or double2), select the relevant Control or click on the row to delete all the keyframes for all Controls.
- Disconnect Input - Remove the input connection. Where an Attribute row contains more than one Control (e.g. int2 or double2), select the relevant Control or click on the row to delete the connections for all Controls.
- Duplicate and Replace - Duplicate the input connection's Layer and replace the connection with the new Layer.
- Reset Attribute to Default - Where an Attribute's value has been changed, return it to the default value.
- Rename - Rename the indices of Array Layers (Value Array, Color Array etc). This includes dynamic arrays found on the SkSL Shader or JavaScript Layers.
- Delete Selected Attributes - Delete the selected indices of Array Layers (Value Array, Color Array etc).
- Reorder - Reorder the indices of Array Layers (Value Array, Color Array etc).
- Add Expression - See Attribute Expressions.
- Add to Control Centre - Add the selected Attribute to the Control Centre.
- Add Pre-Comp Override - Add a Pre-Comp Override to the selected Attribute.
- Control with Null - Create a Null and connect its Position to the selected Attribute.
- Add Behaviour - Select a Behaviour to create and connect its Id to the selected Attribute.
- Add Array - Select an Array to create and connect its Id to the selected Attribute.
- Add Math/Script - Select a Math or JavaScript Layer to create and connect its Id to the selected Attribute.
- Add Utility - Select a Utility to create and connect its Id to the selected Attribute.
- Set Selected Attributes - Set all selected Attributes with the values from the last selected Attribute. Use Cmd/Ctrl to select multiple Attributes.
- Set Selected Layers - Set any selected Layers that include this Attribute to its value. For example, select 3 Shapes in the Scene Tree and then right click on Position for one of them.
- Copy Value - Copy the selected Attribute's values to the clipboard.
- Copy Layer Id - Copy the Layer's Id to the clipboard for use with scripting.
- Copy Scripting Path - Copy the Attribute's path to the clipboard for use with scripting. Note that these paths are case sensitive.
- Copy Generator Type - Copy the Generator's type to the clipboard for use with scripting.
- Paste Values - Paste the values copied to the clipboard to the selected Attribute. Note that data types must match.
- Reveal Generator - Reveal a Generator (e.g. Primitive Type, Distribution, Noise Type etc) to the Scene Tree so that they can be connected to other Layers. Note that once a Generator has been revealed it cannot be hidden from the Scene Tree again.
Attribute Expressions
Expressions can be added to Attributes with input connections to perform mathematical operations on the values. Unlike the inline expressions that controls have, these expressions are remembered and run each time the attribute value changes. Expressions are also saved with the Scene.
Attribute Expressions can only be added to attributes with an input connection. Use inline expressions to perform simple, one off calculations within a control.
When the output value of one attribute is connected to the input of another attribute, that incoming value is converted to the data type of the input attribute before an Attribute Expression is calculated.
For example, an output value of 2.34 will be converted to 2 if connected to an int (like a Duplicator's Count) or 1 if connected to a bool (e.g. checkbox) before the expression is calculated.
Set an Attribute Expression
To set an Attribute Expression:
- Create a Rectangle
- Connect position.x→rotation.z
- Right click on Rotation.
- Choose Add Expression....
- Enter into the Z input (the bottom row).
- Hit Enter.
- Scrub Position X.
The value from Position X is passed to Rotation and doubled by the expression. For example, a Position X value of 120 will result in a Rotation value of
Examples of valid expressions are:
*2- Multiply by 2/3- Divide by 3%100- Modulus 100^2- To the power of 2+10- Plus 10sqrt(9)- Square root of 9
It's also possible to use the incoming value as part of an attribute expression. Use the string value to reference the input value. Examples of valid expressions are:
-(value)- Reverse an input value from a negative to positive value (or vice versa).sqrt(value)- Calculate the square root of the input value. If the input value is 9 the result will be 3.clamp(-45, value, 45)- Prevent the output value from going below -45 or above 45 even if the input value exceeds it.round(value/10)*10- Round the input value to the nearest 10.round(value)defaults to the nearest integer.if(value < 0, 0, value)- If the input value is less than 0, return 0 else return the input value.
See ExprTk for more available options.
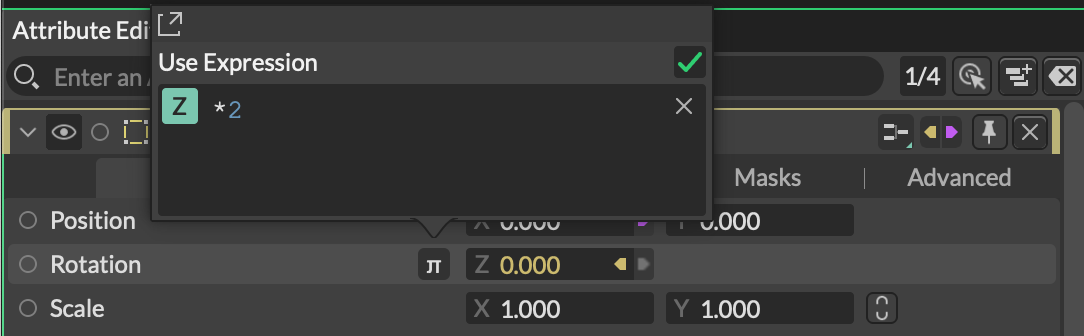
Edit an Attribute Expression
Once an expression exists, it can be edited or removed with the π button on the Attribute's Control Row.
-
To disable an expression - click the
πbutton to open the Expression Window and then uncheck the relevant attribute. -
To clear/remove an expression - click the
πbutton to open the Expression Window and then delete the expression or click thex.