Graph Editor
Intro
The Graph Editor can be used to edit Keyframes and their resulting animation curves. An animation curve is the line drawn between Keyframes to represent the speed in which the Keyframe values change — also known as 'interpolation'. This can be adjusted by manipulating the handles of a Keyframe to create more natural movement using easing.
Previewing procedural animation curves is also supported. For example, if a Noise Behaviour is connected to position.x of a Shape, the resulting animation curve can be shown in the Graph Editor.
UI
Adjusting Animation Curves
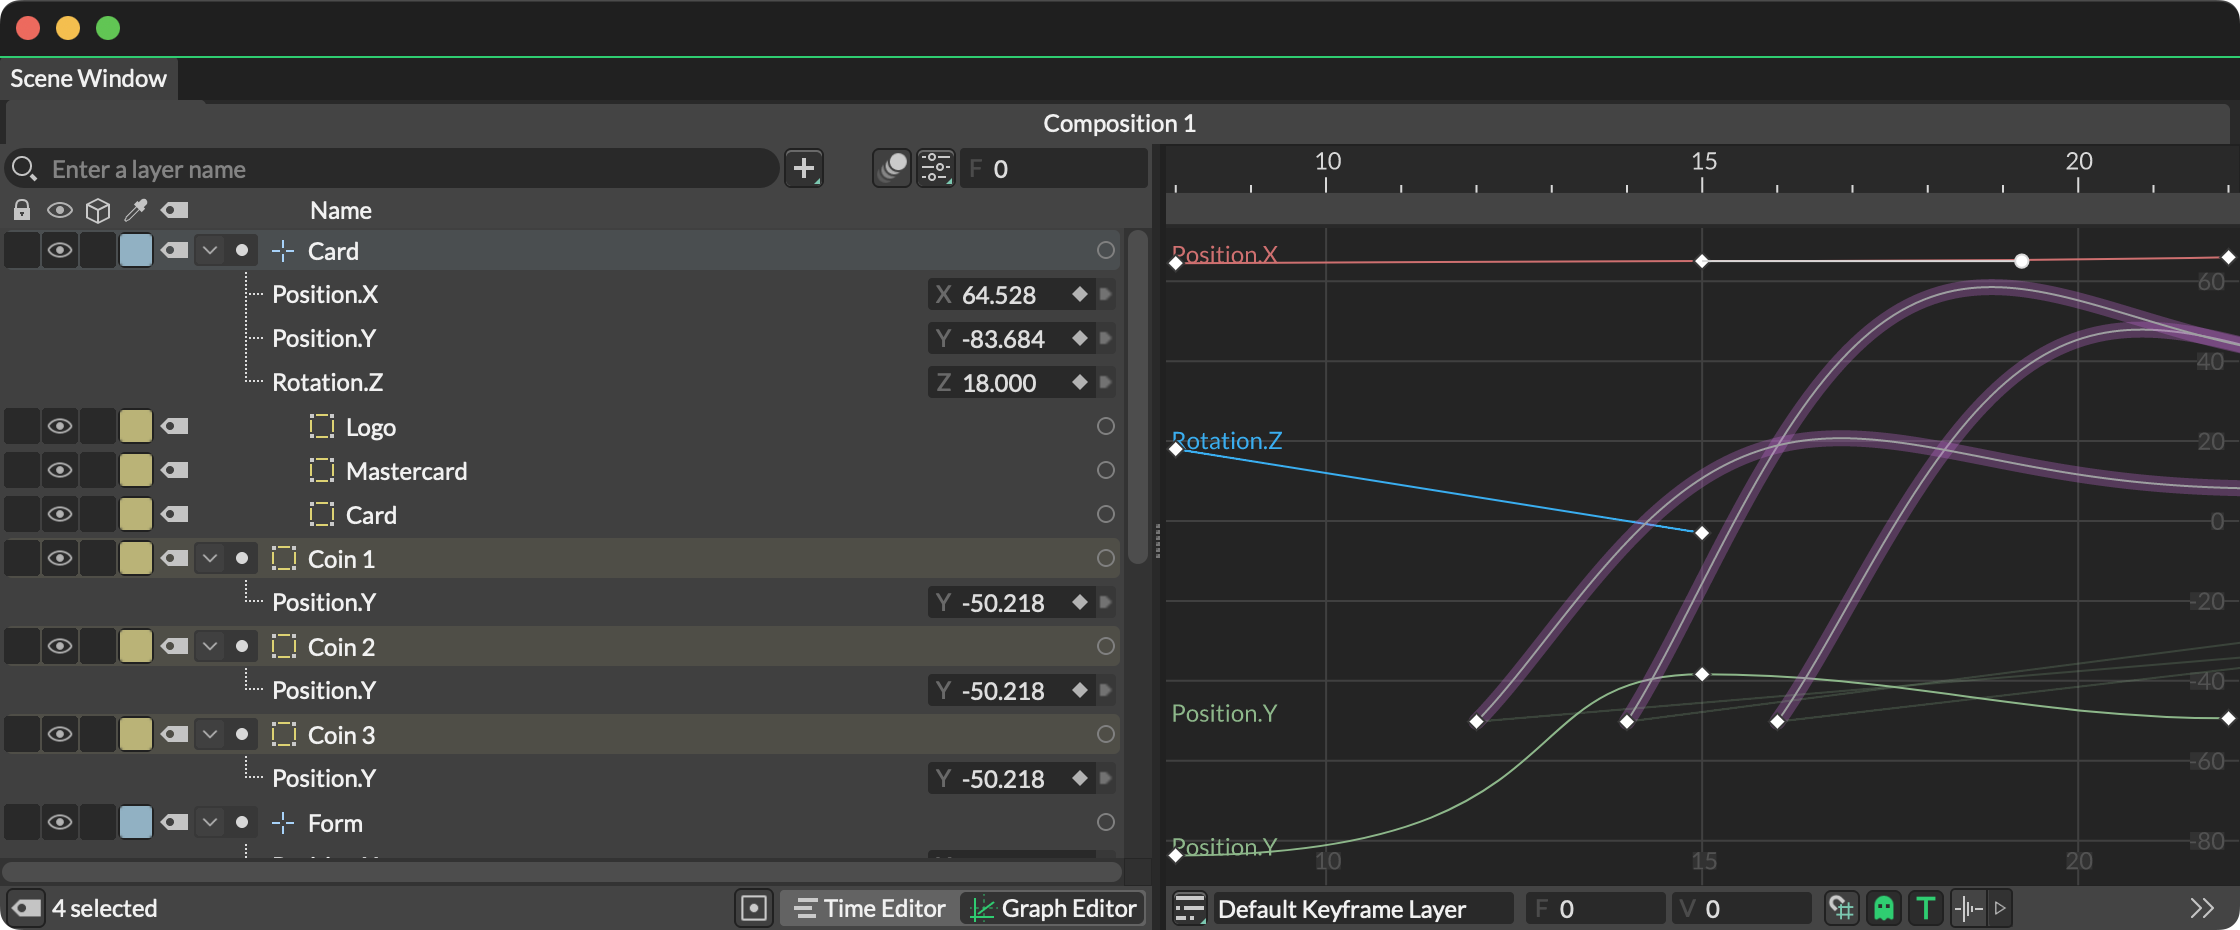
To load Keyframes and their animation curves into the Graph Editor either:
- Select a Layer or Layers in the Scene Tree - this will load all animated Attributes.
- Select an Attribute or Attributes in the Scene Tree - this will load all selected animated Attributes.
- Select a Keyframe or Keyframes in the Time Editor - this will load all the Attributes associated with the selected Keyframe(s) when switching to the Graph Editor.
Once animated Attributes are loaded into the Graph Editor, select the Keyframes to adjust them.
- Move Keyframes up/down to increase/decrease their value.
- Move Keyframes left/right to move them backward/forward in time.
To reveal bézier handles select a Keyframe(s) or an animation curve.
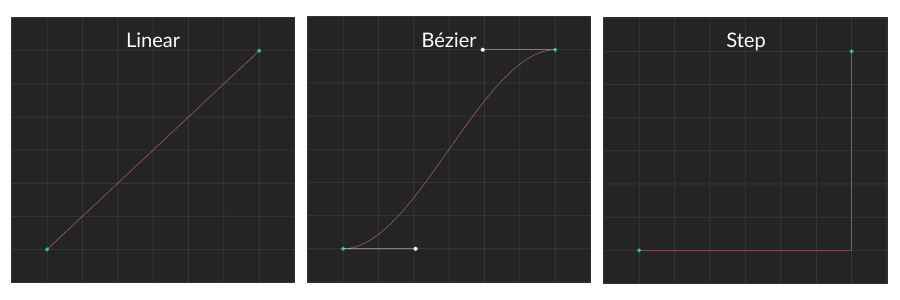
The animation curve can be adjusted by manipulating a Keyframe's bézier handles. Keyframe's have 3 basic interpolations (or states):
- Linear - The resulting animation curve is a straight line representing a uniform rate of change between two Keyframes.
- Bézier - The resulting animation curve is a curved line representing a smooth rate of change between two Keyframes. Bézier keyframes can be used to ease in and out of values.
- Step - The resulting animation curve is an L shape representing no change of values between Keyframes. Also know as 'hold' keyframes, values jump abruptly as the playhead reaches each Keyframe.
To change the interpolation of Keyframes either:
- Select a Keyframe or Keyframes > right click > Key Interpolation and then choose an option.
- Select an animation curve or curves > right click > Curve Interpolation and then choose an option (this will convert all keyframes on the animation curve(s)).
Bézier Keyframes display handles in the Graph Editor. Moving the handles will manipulate the animation curve. See the shortcuts below for how to interact with handles:
Shortcuts
| Hotkey | Command |
|---|---|
| Option/Alt + click a keyframe | Toggle between linear and bezier interpolation. |
| Option/Alt + click + drag a linear keyframe | Convert the keyframe to bezier. |
| Option/Alt + click + drag a joined handle | Convert a joined handle to a broken handle. |
| Option/Alt + click + drag a broken handle | Convert a broken handle to a joined handle (and unify weights). |
| Shift + Option/Alt + drag a handle | Change the weights on joined tangents. |
| X + click a handle | Collapse (remove) the handle. |
| X + click + drag a collapsed handle | Restore a collapsed handle. |
| Shift + drag a keyframe/ handle | Constrain the move horizontally. |
| Scroll | Zoom the Graph Editor. |
| Option/Alt + scroll | Zoom the Graph Editor horizontally. |
| Shift + scroll | Zoom the Graph Editor vertically. |
| Option/Alt + click + drag | Zoom the Graph Editor horizontally and/or vertically. |
| Z + click + drag | Zoom the Graph Editor horizontally and/or vertically. |
| F | Zoom the Graph Editor to frame the selection or, with nothing selected, the Playback Range. |
| Shift + F | With nothing selected, zoom the Graph Editor to the Frame Range. |
| Space + drag | Pan the Graph Editor. |
Double click a curve to add a keyframe along the animation curve.
Looping
To set looping on an animation curve select a curve or curves and right click to bring up the contextual menu. Choose from:
- Loop After - Looping will occur after the last keyframe:
- None - Don't loop.
- Looping - Start the loop at the value of the first keyframe.
- Looping with Offset - Start the loop at the value of the last keyframe.
- Oscillate - Ping pong between the first and last keyframes.
- Loop Before - Looping will occur before the first keyframe:
- None - Don't loop.
- Looping - Start the loop at the value of the first keyframe
- Looping with Offset - Start the loop at the value of the last keyframe.
- Oscillate - Ping pong between the first and last keyframes.
The buttons in the Toolbar at the bottom of the window can also be used.
Procedural Animation Curves
Where a Shape's animation is being driven by another Layer, its inherited animation curve can also be previewed in the Graph Editor. For example, if a Noise Behaviour is connected to a Shape's Position, selecting that Shape in the Graph Editor will preview its animation curve.
This is also true of Animation Offsets.
Toolbar
Keyframe Layer - See Keyframe Layers.
Frame - With a Keyframe(s) selected, set the frame number for that Keyframe(s).
Value - With a Keyframe(s) selected, set the value for that Keyframe(s).
Grid Snapping - Use the checkbox to enable and set the size of the grid.
Ghosting - When enabled, a faint line will be drawn whenever adjustments are made to keyframes or handles showing where the animation curve was.
Draw Channel Names - When enabled, attribute names will be displayed in the Graph Editor.
Beat Markers - Add guides to the Time Editor to indicate audio beats. Grey guides represent Beats with the blue guides marking the Bars. Toggle the button to enable/ disable them or use the arrow to open a disclosure window containing the options:
- BPM - Set the Beats Per Minute for the audio track.
- Beats per Bar - Set the number of beats in each bar.
- Offset - Move the markers forward or backward in time.
Looping - See above.
Interpolation - Set keyframes to be linear, bézier or stepped.
Béziers - Join or break bézier handles.
Align - Align selected keyframes from different attributes. When aligning left/right all selected keys will be aligned to the key furthest left/right. When centre aligning keys they will be aligned to the average position of all selected keys.