Multi-Point Gradient Shader
Intro
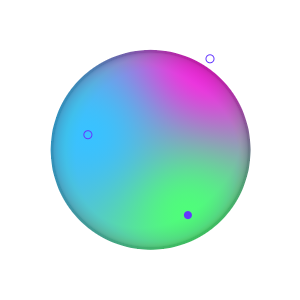
Create complex gradients by setting the position, color and influence for multiple points.
UI
Premultiply - When checked, the calculation for transparent pixels is premultiplied.
+ Add (button) - Add a new Point to the gradient.
Each Point includes the following attributes:
- Color - Set a color for the Point.
- Position - Set a position for the Point.
- Influence - Determine the strength of the Point.
- Jitter - Add noise to the interpolation curve based on its intensity. Jitter will be added between the selected Stop and the next one to its right.
The stops of a Multi-Point Gradient Shader can be set via the Set Gradient from Palette option from the hamburger menu in the Color Window. Select a Multi-Point Gradient Shader Layer and then run the command. The stops created will be randomly positioned based on the Composition's resolution.
Layer Tool
Points can be manipulated in the Viewport with the Select tool. When the Multi-Point Gradient Shader is selected in the Scene Window, small purple dots will appear in the Viewport.
- To move a Point - Click + drag a purple dot.
- To duplicate a Point - Option/Alt + click + drag a purple dot.
- To increase/decrease a Point's Influence - Shift + click + drag a purple dot.
- To delete a Point - Select a purple dot and hit the delete key.
- To change a Point's Color - Double click a purple dot and adjust the Point's color in the Color Editor that pops up or, drag a swatch from the Color Window and drop it on a purple dot.
Press Escape to close the Color Editor window to maintain selection.
If the same Multi-Point Gradient Shader is connected to multiple Shapes/ outputs, then the first connection is used to position the purple dots in the Viewport. This can be identified by clicking the purple output connection icon for the Multi-Point Gradient Shader in the Scene Window or Attribute Editor and picking the bottom layer in the list that appears.
The Layer Tool is not available if the Multi-Point Gradient Shader is connected to a Blend Shader.